|
This is an Automatic Water Change System that Requires:
No Pumps
No drilling
No Air
Little Maintenance
Because of this:
You never need to risk breaking a tank to drill it.
Moving
tanks around is no problem.
System
can be modified easily to add or delete tanks.
This system will not:
Pass water between tanks
Spread diseases or pathogens
Water being added is:
Oxygenated
Proper temperature
Evenly distributed between tanks
However, the system requires:
-Being gravity (siphon) dependant, tanks must be at least 12”
off ground.
-You will need a nearby sink to both fill and drain, OR a
reservoir and a drain
holding temperature controlled, aged water. (Where you will then
need to
pump the water from the reservoir)
-Using water from the tap will work without dechlorination, as
you will only
be adding up to about 20% tank volume at a time.
-Obtaining and Working with PVC and PVC glue
Pros-
-No drilling tanks, leaking drain portholes, pumps, motors or
moving water
with air or powered means that can fail
-No need to turn anything off or disrupt fish to change water
-No need to add dechlor
-Can do changes regularly, at any percentage, as often as you
like
-What used to take me 3-4 hours on Saturday of carrying buckets
I
can now do daily, with no effort, in 40 minutes.
-Temperature shock is avoided with frequent, small changes
-You can spend more time cleaning tanks and doing other work
-No backflow siphon issues
-Water does not mix between tanks
-Fish are healthier, bigger, and breed more frequently.
-Plants do far better
-Periods of inactivity (vacations, etc.), are less stressful on
the fish because water changes continue.
-Diseases are far less frequent (I may have had a case of ich
once
in 5 years, and nothing else).
-Though I cannot drain water from individual tanks with the
system,
I
can easily fill whenever I clean by turning on that zone for as
long as I need manually. I can turn off the other tanks in that
zone
if I do not want to change any water.
Cons-
-If you need to empty a tank you must still do it by hand
-
You are committed to the water parameters that come from your
water supply.
unless a tank is taken off of the water change system, it must
do well at the pH
and hardness of your source water.
-At times there can be a fair amount of working with PVC glue
-Tanks must be observed regularly to restart a drain siphon if
it stops
-You should be aware of internal water pressure within the PVC
system
(Do not turn water on full when valves are open if water is
turned off
into tanks.)
__________________________________________
Changes made to my fishkeeping to best
adapt to the system.
1. My fishroom is primarily bare bottomed tanks. The system does
not
clean up mulm or vacuum the bottoms of tanks
2. Most of my fish are well adapted to the water quality that
comes
from my tap. My Ph is about 7.4, Hardness is low, at 90ppm.
3. I am experiementing with doing a 4 minute change daily,
rather
than 10 minutes every other day (which equals about 15% in 10
gal. tanks
from my tap).
4. I am not concerned when they are occasionally overfed, but
have strived
to keep the bottoms free from mulm buildup. However, water
changes can be
frequent enough to prevent ammonia buildup, encouraging the
cultivation of
infusoria for fry- so I leave a thin layer of mulm in my fry
tanks
(particularly the smaller egg layers). When a tank appears
stressed,
I
first look at temperature, knowing that water quality will less
likely be
a
factor.
5. Whenever I do any work that involves draining a tank more
than an inch or
two I always ensure that the drain siphon has not stopped
working.
________________________________________
Materials needed
for installation:
Pad and paper- everything is written out before hand
A 2, 4 or 6 zone control box and sprinkler valves - depending on
the size of
your room, that are available at any Home Depot, Lowe’s etc. A
lawn sprinkler
control box costs about $30, and a valve for each zone is about
$10.
System can be done entirely manually with lines splitting into
separate zone
lines from sink, and changes are then done by turning on water
by hand, rotating
from zone to zone. You must be sure to have a zone open when
turning the water on,
and open next zone before turning current zone off so that PVC
setup isn’t forced
to hold entire tap water pressure (though it should be able to).
PVC- get to know the guys at Home depot. They will wonder what
you are doing after
buying up all their ½” valves half a dozen times. Your planning
on paper will tell
roughly how much PVC, fittings and valves you will need. PVC
materials are bizarre
cheap. 10 feet of half inch PVC costs under $2.00.
You will be using ½ inch PVC tubing (for all filling lines), ¾
inch (for all drain
setups from each tank) and 1 inch section lengths that will
collect water from the
tank drains and connect to the main sink drain.
I highly recommend at least one hand-held PVC cutter (about
$10.00).
PVC glue- I just use the simple clear stuff in the gold can. Use
your own judgement.
You MUST glue all fill lines, for they hold pressure from the
tap. I don’t glue most
drain lines once the water has drained from the tanks, and I
prefer knowing it can be
torn down or changed easily, but I do encounter occasional
dripping. However, drain
setups at each tank MUST be glued until the water gets to the
main drain, or air will
get into the setup where it should not, and the siphon can stop.
PVC glue runs about
$2.50 a can.
Angles, Ts, Valves etc.- Each tank’s fill and drain line setups
will require a certain
number, then multiply out. They are also affordable-
“contractor” packs- packs of 10-
are also generally under $2. Valves are the greatest expense.
Each tank has one, and a
few more valves will control where water goes based on the size
of your setup. They run
about $3 apiece. As a rule (depending on your room) you’ll be
using 90 degree pieces
in ½”, ¾” and 1” sizes. Also connectors, tees, and end caps and
in all three sizes,
reducers will be 3/4” to ½” and 1” to ¾”, but you will only
using ½” valves. Again,
try to determine how many you will need ahead of time to keep
visits to the hardware
store to a minimum.
Electrical Ties- I use these to help hold and stabilize the
lines against the racks
and each other. 8 or 11 inch ties work best, and they can be
connected to one another
to create longer pieces if needed. Bags of 100 are about $9.
You will also need:
About a weekend to do this, depending on the number of tanks you
have.
A ventilated area
A drill with a 16th inch or so bit
A Tape measure
2 pairs of pliers to easily disconnect joints not yet glued
Clothes you don’t mind getting wet, and possibly stained with
PVC glue.
Best way to do it:
Be aware that it will be 1 week after building this system
before being able to use it.
The PVC glue must be fully cured and dissipated before water
running through the PVC
cleans off the glued joints. Introduced water pressure will move
any glue residue into
the tanks with the fish. I have lost fish that died as a result
of my running water
into a tank through a line containing new glue that hadn’t dried
thoroughly.
Steps:
1. Ensure
that all tanks are where you want them to be. Have tanks placed
to provide
easy access behind them, and set up in straight lines when
possible. The bottom tanks
must be at least 12 inches from the ground and above the drain
used to collect the water
that drains out.
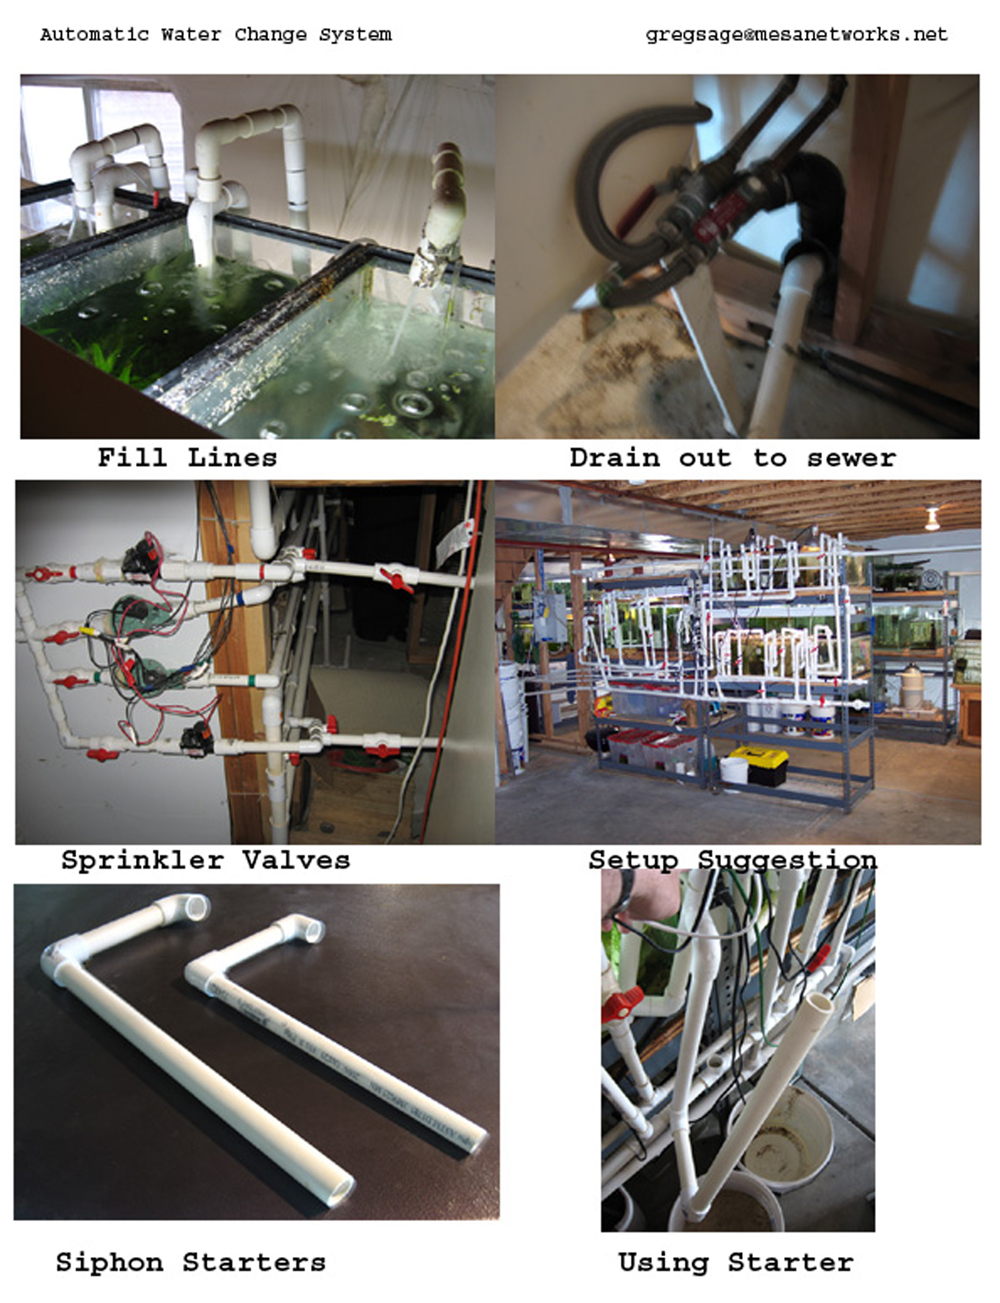
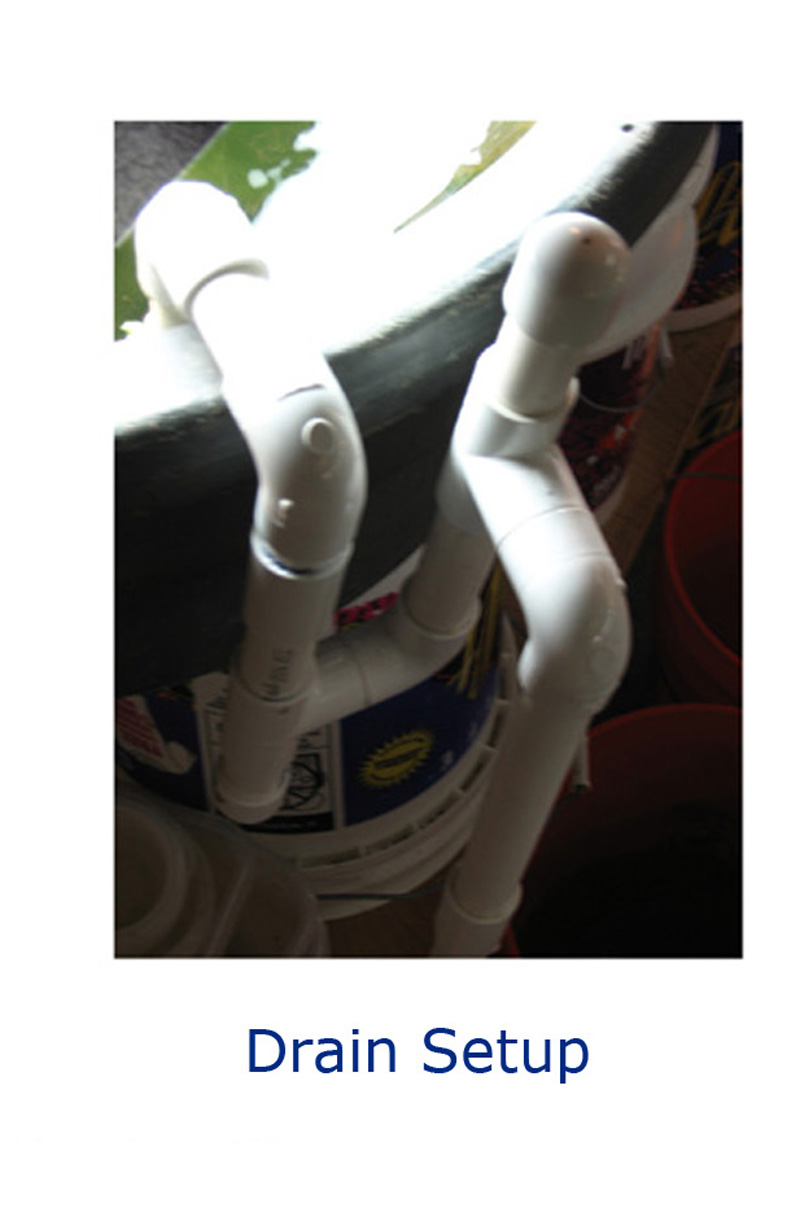
2. Build all of the drain setups
for each tank from ¾’ inch tubing. Observe attached
drain siphon setup photos. Keep in mind the size of the tank
each will be used on,
and where the main drain line will be located that it will be
draining into. All fill
lines will be ½ inch and drain lines ¾ inch. You want to be sure
that water never fills
faster than it can drain. All drain lines collect to a 1 inch
line so that it will not
back up.
You will see that where the drain T is placed within the drain
setup apparatus determines
the water level in the tank. Always keep at least 2 inches
“headroom” from the surface of
the water to the top of the tank to prevent overflowing if the
drain setup loses its
siphon (from having worked on the tank where it was drained
down, etc.)
I built one for each size of tank (all 10s, 20s etc.), didn’t
glue them, took them each
back apart, then made each piece multiplied out to number of
tanks. Then I put them
together and glued them, then set aside.
The most time intensive part is drilling all of the little holes
into the in-tank drain
ends so that any fry are not sucked out.
The connection where this drain setup drains into the 1” drain
line will NEVER be glued
into the 1” line. You will need to use this joint to restart the
siphon if it stops.
(which happens very rarely- maybe once every other month on one
or two tanks in my 60
tank fishroom, and can always be traced to my working on it or
it being drained down
too far, and I didn’t check it afterward)
3. Now build the ½” fill lines for
each tank. Drill a 16th inch hole into the middle of
each end cap. Each fill PVC line must be made specifically for
each tank. Keep in mind
where the light sits, so that water flows into tank
unobstructed. I use the white plastic
honeycomb light grating to cover tanks that need to be covered,
they don’t obstruct water
flow from the fill lines.
Do not make them so that drilled caps sit in the water, water
should enter from cap
ideally 2-3” from surface to provide aeration and prevent back
siphoning into other
tanks when the flow stops.
4. Glue fill
line setups together, keeping knobs so that they are easy to
access and
knobs can move freely from open to fully closed.
5. Begin to conceive where the ½”
fill line from the sprinkler valve back at
the sink will be placed, and how the fill line will best lay
against the back
of the tanks and attach to the rack, while next to the drain
setups.
-I installed my fill lines first, then had the drain sit lines
against them. See
attached top rack PVC photo.
-Keep in mind that the fill lines will hold pressure, so keep
turns, etc. with
the fill lines to a minimum.
___________________________________________
Keep in mind that everything you do until step 10 will be
disconnected and
re-built outside or in a well ventilated area to be glued
together in sections.
The sections will then be be glued together in the fishroom as
they are put in
their final place on the tanks.
___________________________________________
6. Lay out 1” drain line tubing
behind tanks and begin to put in the 90 degree
angles etc. to fit the lines to the angles of your room.
-There needs to be a 1” line for each row of tanks that will
then drain into
the single 1” line out to the sink drain.
-Temporarily attach this line to the rack, or support it as you
will want it.
(Nothing will be permanently attached until after everything is
glued in a
ventilated area and brought back to the fishroom. I do not glue
the 1” drain
lines, so they can be roughly put in place.)
-If you are really organized and somewhat good at this, gently
slope the 1”
drain line toward the sink drain from far point of the room.
This will help to
avoid any standing water within the setup.
7. Determine how you will tap into
the sink drain line.
I put a “Y” piece in below the fishroom sink so that both the
sink and the fishroom
water go out of the house together.
In one fishroom, instead of draining to the city sewer I drained
into a plastic
garbage can with a pump that then moved the water out into the
yard and garden.
8. Run the fill line from the sink
to the sprinkler valves mounted nearby.
Hook valves up to control box.
Have fun and be creative with all the new PVC you just bought,
and end up with a
line from each valve to a designated portion of the fishroom.
9. Hang the already made drain
lines from the tanks.
The tanks of each row will drain into their own 1” drain line
that will then T
into the 1” line that goes to the sink drain. Put a tee into the
1” line, then
you will need a 1” to ¾” reducer to connect the ¾” individual
tank setups into the
1” line. Do not allow a tank to somehow drain into a tank below.
Each tank row drains
into the same 1” drain line that goes down to the main drain
line and out to the main
drain. This will prevent water mixing between tanks. (This can
be seen on photo of back
of tanks, attached)
To prevent vacuums within the 1” drain lines from developing,
causing siphoning to start
where it is not intended, I put a T into the lowest 1” drain
lines with an open ¾” line of
PVC rising straight up to above the room’s water level, allowing
air to enter the drain
lines as they head to the end drain. This opens up the flow,
prevents siphoning and helps
keep water from building up within the drain system. In my room
of 6 zones, I have put in
4 of them spaced equally throughout the room.
_________________________________________________
10. Begin cutting tubing for both
fill and drain lines that will be connected to already
built fill and drain setups and put it all together. Build as it
will be in final form
with light hoods placed in, etc. Do not glue anything yet.
11. Divide up when finished into
sections that can be brought to a well- ventilated area
to glue. Obviously, keep all angles of each connection as it
should be- I have used a marker,
putting a line over the joints that needed to be angled, then
simply matched them up when
outside. Completed drain setups can be left on tanks, they will
never be glued into drain
lines for they need to be disconnected to start or restart the
siphon.
______________________________________________
PVC glue and its fumes are toxic to fish. Always allow any
freshly glued area to dry
thoroughly- days, not hours, before running water into the tanks
from newly glued areas.
_______________________________________________
12. Glue sections together. Let dry
and air out THOROUGHLY. Keep all valves in the open
position to assist air flow through the PVC when drying.
*Nearly all of the times I have encountered problems with drain
siphons has been due to spots
I’d missed gluing at this stage of the process.
Be aware to keep structure in small enough pieces when finally
placed on the tanks in the
fishroom so that it can be put together and glued easily,
without any force or tension.
13. Carry back into fishroom and
place on tanks, aware of where sections need to be
connected. Do one section at a time, make sure every connection
is glued that needs to be
when putting the system together. See attached back of rack
photo.
_________________________________________________________________________________
Remember:
It is only PVC. As long as you have one or two connectors and a
little glue you can cut a line
(As long as the water is off. This may sound stupid. I’ve done
it. More than once.) and change
whatever you’d like. Put it back together and voila, good as
new.
_________________________________________________________________________________
14. When all is in place and glued
marvel at your work and try to forget about it for at least
3
days, a week is best. Leave all valves on tanks open to assist
air flow through system.
Then after a wait of 3-7 days…
15. Make a “Siphon Starter”.
Observe siphon starter photos attached. You will need two
pieces of ¾” PVC, one maybe a foot long, the other about 18”.
Connect with a 90 degree elbow,
then put 2nd 90 degree elbow on other end of shorter piece.
16. Start the siphon in each drain
setup structure for each tank:
To start the drain siphon loop for each tank: Be sure the tank
is filled slightly above where
the T in the drain setup will drain down to the 1” drain line.
Gently connect the 90 degree elbow
(because it will need to come off quickly) on the shorter end of
your siphon starter over end of
the line going down to the 1” main drain line. Place finger over
hole in top of drain setup and
inhale firmly to begin siphon in outer loop. Then connect to the
1” drain line placed to take water
from that tank while trying to get as little water on your shoes
as possible. See attached Siphon
Starter photos.
17. Now go around the room and
check that all of the valves on the fill lines into each tank
are
open about halfway. ALWAYS be aware to keep system “open”.
Closing off many or all of the valves
could cause a crack or a blowout in the system over time.
18. Now the fun begins. GENTLY turn
on the water about 1/3 to half the strength you want to
eventually expect to use.
You are looking for:
-
Leaks, Drips
-
Water going where it should not. This sounds silly, but if you
have more than 10 or 20 tanks,
you may find that a drain line taking too many tanks too soon is
causing another tank in an odd
place to fill rather than drain. In my room of about 60 tanks I
had two of those spots to fix.
-
How evenly is water being distributed? Begin to turn some fill
valves up, some down depending
on flow to adjust the flow into each tank. If no immediate
problems, turn up flow of water
slightly, continuing to adjust. Tanks closest to water source
will be at greater flow than tanks
later in line and tend to fill faster, etc.
-
Watch for some tanks filling faster than others. This could be
water going in, but it is more
likely that the siphon hasn’t started properly in the drain
setup, and needs to be restarted.
-
Water flow from the nozzles hitting light hoods, causing any
problems.
-
Watch for water going into tanks causing too much disruption,
and adjust accordingly.
19. Let it run for up to 10
minutes, possibly adding an antichlorine agent- you do not yet
know how much water is actually being added. Gradually increase
the pressure to the desired flow,
watching for any of the problems listed above.
20. Turn off. Then set timers at
control box. I would keep the water changes gradual at first-
I
have been doing 15% every other day for 4 years (about 10
minutes on a 10 gallon tank with
water pressure at about 2/3rds full strength.). At first, I
would start at about half that,
increasing as you wish, keeping in mind that too much can bring
chlorine and chloramine issues.
UPDATE- Since this article was written, I have since
settled into a 15% water change daily.
At some point you may want to find out exactly how much water is
being changed. To do this I
divert the fill stream from a tank at about mid distance from
the sink into a bucket, measuring
the amount of water in the bucket at specific time intervals,
keeping track of where the knobs
are placed where the water is turned on. Full strengh with both
hot and cold turned up could
end up too hot, and far more water than you need.
Maintenance: This for me is simply
looking for puddles, locating the leak and fixing it,
usually by replacing or simply gluing the offending joint. As
well, due to joints weakly
glued initially or missed having been glued altogether, a drain
setup will lose its siphon-
in my room it will happens on one tank about every 3 months.
Because the water levels
in each tank are set where the "T" is placed going down to the
1" drain line, a 15% addition
during water change will not overflow the tank, but can be
spotted and fixed before the next
water change.
UPDATE- Since this article was
written I have seen that the eventual loss of siphon on a tank
can often be spotted days before it actually happens. But more
often, I have had problems from
turning off a tank to restart the siphon at a later time,
(because I had drained the tank working
on it, or it looked liked it needed to be restarted) and then
forgetting about it- resulting in
the tank going a period without water changes. So I have put a
1/4 inch strip of red electrical
tape on every tank, marking where the water level of that tank
is when the drain siphon is working
properly. When a drain line begins to lose its siphon it will
sometimes go gradually- over a few
days, and the tape will show the water level rising in the tank.
If it has been turned off or is
not filling for any reason, the water level in the tank will
then evaporate down.
The room now has close to 1000 ft. of tubing. I have tanks from
each zone spread throughout
the room (all 30’s fill at same time wherever they are located
in the room, etc). This is simply
because the system evolved over time, and I did not move tanks,
as I probably should have, to
accommodate the system. That is not the easiest, nor the most
sane way to do it. Hopefully,
yours will be set up more cleanly and less prone to the
occasional repair. With my system of
hundreds of connections and joints, I fix about 5-6 a year,
usually in one or two quick
sessions.
On the rare times a drain siphon loses its siphon it is usually
because I had worked on the
tank and drained the tank too far, then forgot to restart the
siphon. When this happens it
will not drain- Obvious because the tank is fuller than the
other tanks. (the reason for the
“headroom” mentioned earlier.) If you are only changing 10% or
15% each change, then the
tank will not overflow.
Sometimes a joint had simply been forgotten to be glued, and at
other times it may just
need to be restarted. Of dozens of weekends and vacations of up
to a week away I have never
had a siphon lose its siphon when I was gone.
When I have had any problems:
Over the 6 years of using this or a similar system, problems
have been rare, but here
is a rundown:
1. A sprinkler valve once malfunctioned, and a section kept
refilling and draining,
eventually killing all of the fish in that zone. That was the
single biggest disaster I
have ever had. I now spend the extra buck and get better quality
valves. There has never been
another instance similar to that. Preventable.
***** UPDATE- When putting in the sprinkler controller, most
will provide an option for a
valve that will come on before zone 1 and turn off just before
the last zone finishes. This
way the longest a broken valve can cause the water to flow into
tanks is the maximum length of
time all of teh ziones you are using take to fill- preventing
losses. Today I use that
"master valve" setup, and would never consider the system being
set up without it.
2. Twice I lost tanks of fish to water changing too soon after a
repair and fumes wiped
out the fish. Not all fish were affected. In both instances 3 or
4 tanks were affected,
but in both instances it was only the tiger limias that all
died. Again, preventable.
3. Twice I put water in that was too warm, but I was only
changing 15%. I would never have
known, except that in both instances I wiped out my A. toweri
that seem particularly
sensitive to warm water, while affecting no one else. Also
preventable.
And the last of those problems happened over 4 years ago. Good
Luck!
Greg Sage
selectaquatics@gmail.com
selectaquatics.com
Back to Downloads Page
Home
Species for Sale
Fishkeeping Tips
Receiving and Shipping Fish
|
|