|
Select Aquatics of
Erie, CO. |
|
|
|
|
 |
Most people
set up their fishroom by allowing it to
develop as it grows, a tank here, a tank there. An effort is made to
make the best use of
space, keeping the wiring out of sight while trying to keep maintenance
into each tank as comfortable
as possible. You want to
be able to get around every tank, and have close access to a sink. Some
ventilation would be nice,
and a way to include a
centrally located blower should be taken into consideration.
Wiring means extension cords and
power strips, ideally
away from somewhere that water may splash on them.
This approach generally
causes problems in the long run. The best way is to decide ahead of time
what you want the room to
do. What do you want to
work with, where will every tank go? Will there be an area where all of
the fry tanks should be, so
that their heavier
maintenance can all be done in one place? An area where breeders can all
be together and watched closely
for fry. Without a plan
ahead of time, you could easily face periods where broad changes have to
be made after the fish are
in all of the tanks,
changes that could have been avoided when first setting everything up.
Though a large
undertaking , it has been positive that every 6-7 years I have needed to
entirely redo the fishroom.
Everything can be moved
and cleaned around, and an improvement and modernization can be done to
address how the room has
developed. Each time the
room is set up there are many opportunities to consider, and each redo
can build upon experience
gained from the last
setup.
If the room you are
planning is going to be 5 tanks or a hundred, there are some
things to keep in mind that are consistent
for both, and hopefully I can provide some
information that will help you.
|
|
|
|
|
|
 |
|
 |
|
|
|
|
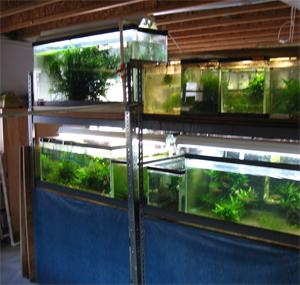
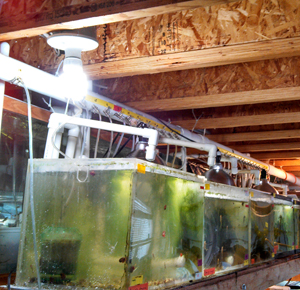
Two of the metal racks. Tanks are near eye level,
maintenance is
area below is used for storage. Due to eventual rust
issues, these
were replaced in 2014 with sturdier wooden racks - click
HERE
|
|
The basic floor plan of
the fishroom. Roughly to
scale, not shown is a 30 inch walkway between the
racks and the surrounding walls. |
|
|
|
|
|
The room you
choose to use for the fishroom will need to meet a few requirements.
Besides being large enough to hold the
tanks and stands, allow
yourself at least a 30 inch walkway behind everything to easily
do maintenance, and aisles that
are comfortable to
navigate. You could easily create a fishroom that makes great use of
space, but is too cramped and
claustrophobic to want to
spend much time in. This is especially important if you are planning to
keep cichlids, for
example, where the room
may need to be kept warm as well.
Allow yourself room for a
work area, where you can keep a few tools, small containers to
move fish from one place to
another, nets, etc. This
can be as simple as an open spot on a rack where a tank was going to go,
but you need somewhere
that can serve as a
“command center” for whatever comes up or routine work that needs to be
done.
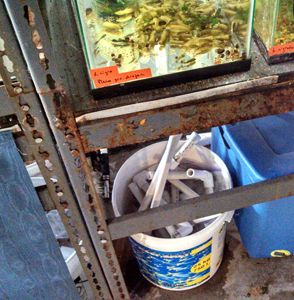
Most importantly, keep in
mind that you will need storage space. A side room, whatever, but
there will be things you will need
to keep on hand that are
unsightly to just be leaving around. For example, a very important
component to a working fishroom,
that visitors never see,
are the buckets. Generally the 5 gallon painter’s type, but this
fishroom keeps a wide variety of
plastic containers used
for any variety of reasons. Here we have about twenty 5 gallon buckets,
and there have been times
when many things are
being moved around and they have all been in play at once! Siphon
hoses, a place for foods, extra
tanks, medications, etc.
all will need to be stored out of sight. Here, all of the tanks are on a
siphon driven automatic
water change system,
requiring that all tanks be about 30 inches above the ground, as their
drains are sloped toward the
house drain. So each rack
has a waterproof skirt from the bottom shelf to the ground, behind which
is used for storage.
If you are going to use a
basement, you may also want to find out how consistent the
temperature is from one part to the
next. My basement is a
large “L” shape, and I was surprised to find a temperature difference of
3-4 degrees between the two
ends of the room. It
isn’t that there can be anything done - unless you wish to add
insulation- but that information goes
into the planning of
which species and tanks should go where.
Sitting with a pencil and
paper, before a single piece of wood is cut, many potential problems can
be avoided. When
planning out which tanks
will go where, we would all like to make the best use of space. This
way, the greatest number
of tanks can be set up in
the most efficient manner. However, this often does not make for the
best fishkeeping. With
multiple tanks, every
tank must be in a placement where it will receive 100% care.
Often, we set up groups of tanks, and
those slightly out of
sight or placed on too low a shelf will get neglected. Your goal when
first planning out the room
is to be sure there are
no areas where maintenance or routine care can be challenging, or more
difficult than in the other
tanks. The energy we have
will not always be 100%, nor do our schedules always allow for the time
to properly care for our
tanks. When tanks are not
as easily accessible, over time, they suffer to a greater degree than
those tanks whose
maintenance is simple,
convenient and consistent.
If your room is being set
up such that needing 3-4 days to go on a trip isn’t possible, or a few
days of being sick in
bed can be disastrous for
the fish, a better setup may need to be considered. Keep things
straightforward and relatively
simple, so that others
can be easily instructed as to how to take care of your room if you need
to have someone come in.
There are a few
considerations I try to follow:
The lowest tanks in the
room should still be high enough off the floor to see into easily, as
well as to clean and
see easily beneath. This
also helps with cleaning the tank, as a siphon hose can be used more
easily when the tank
is 24-30 inches above the
floor. This distance from the floor may be necessary if you use an
automatic water changing
system requiring drain
lines to slope toward a main drain.
The tops of the tallest
tanks in the room must be easily reachable to feed into the tank and do
maintenance.
Each row of tanks needs
to be far enough apart from one another that there is enough space
between the top of
one tank, and the bottom
of the shelf above it. There needs to be enough room to do maintenance
easily and put in and
remove pots, filters etc.
Another consideration is
when choosing between rooms to use, decide if you will be doing
much breeding. If so,
when the fishroom is in a
room with windows and natural light, the fish kept there will receive
seasonal cues that could
cause them to breed
seasonally. Often many species will slow their breeding or stop
completely from about mid-September,
and resume in early-mid
April. A room with no natural light can be kept on a similar light
schedule year around, and
most fish will breed more
consistently throughout the year.
|
|
|
|
|
|
 |
 |
 |
|
|
| |
|
|
|
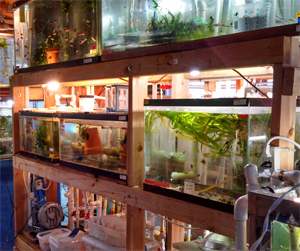
Wooden racks when constructed well
are sturdy
and functional. The
mounted CFL bulbs can be
better seen in this
pic. A backup 1/8 hp blower
can be seen at lower left
in photo.
|
|
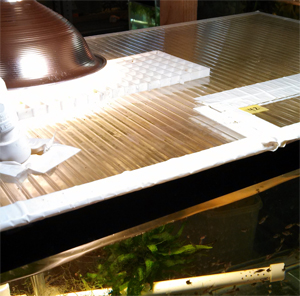
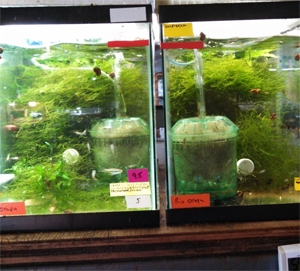
The twin wall thermal polycarbonate 8mm
tops,
easily cut with a dremel tool. White duct
tape is used to seal and make feeding doors.
Egg crate plastic can be seen under light. |
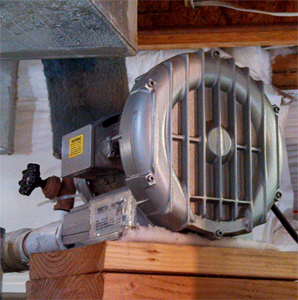
The 1/4hp blower used to power
the entire room.
All of the air needed everywhere in the room comes
from this unit. A 1/8hp blower is perfect for up
to 60 tanks. Smaller options and types are available. |
|
|
|
|
|
Another consideration is
humidity. Many of us do not use tops on our tanks, and I
have found this is fine up to about
15 tanks (of at least 10
gallons each), and beyond that in a smaller room, humidity issues can
begin. As a rule, humidity
becomes a problem when:
Condensation
begins to appear on the insides of the windows- particularly when it
occurs in other rooms in the house.
Mold forms in window
channels, in corners of the ceiling, etc. Mold is something to
keep an eye on. Most of us fishkeepers
blow it off, and people
that know anything about mold totally freak out. Some people are very
sensitive to molds, and
problems from long term
exposure to mold spores for some people is well documented. After a mold
issue appeared in my
room a few years back, a
team of mold experts came out to do an inspection to assess any damage.
While stepping out from
the fishroom where I
worked many hours a day with no ill effect, I was met by workers dressed
in full head to foot white
suits with ventilators,
shocked that I would be in their midst without protective clothing. As a
result, I installed a humidity
controlled 10”
hydroponics fan, using the Dryer appliance exhaust hole provided
in the basement/fishroom. In
combination with cutting
tops for all of the tanks (120 tanks), made of thermal twin wall 6 or
8mm polycarbonate sheeting,
the humidity now stays at
30 – 45%. It used to be closer to 65-70%, effectively ending the
mold problem, and in fact
often keeping the
fishroom at a lower humidity than the rest of the house.
That sheeting is used to
make walls for greenhouses, and is available from most greenhouse supply
stores. Unlike glass,
it is lightweight,
transparent, doesn't break, cleans to as good as new and doesn't become
yellow or become cloudy. It is
available online, but is
prohibitively expensive to ship. Initially coming in 6 x 20 foot sheets,
it can be cut into 3x4 foot
pieces that can
be put into an SUV and cut up into aquarium tops. Easily cut with a
dremel tool, duct tape is then used
to seal the
ends so that water does not get into the channels inside the sheets, and
little feeding doors and other
customizations can
be made to accommodate PVC siphon tubes, etc.
Humidity needs to be
addressed because besides any mold issues that may develop, damage to
wood, metal piping,
electrical infrastructure
and fixtures can occur, resulting in repairs if the need arises to sell
the house, etc.
|
|
|
|
|
|
 |
|
 |
|
|
|
|
A central air system keeps the room
organized and easy.
2 inch PVC should be used with air valves available at
many online fish equipment suppliers. |
|
Simple box filters work great in a multitank fishroom
when striving for
simplicity, cost effectiveness,
cleanliness and ease of
maintenance. |
|
|
|
|
Electrical issues
are always of concern in a fishroom, and there are a few basic rules to
keep you out of trouble.
Essentially, the
electrical needs come down to:
1.The blower, linear
or diaphram pump used to power the air into all of the tanks.
Besides aeration, these also power
the
filtration in most fishrooms, as individual hang on the back filters in
a fishroom quickly becomes maintenance
intensive,
expensive to set up and run (when compared to a single pump or blower,
when each filter requires its own
electrical
supply), and introduces far more variables that become clogged, can
break, etc. A box filter in each tank
(or
equivalent such as sponge filters, etc.) has no moving parts, is
easy to clean monthly, and is a consistent form
of filtration
throughout all of the tanks. The filters when changed can be cleaned and
checked, essentially maintaining
them in new
condition for many years, and their initial cost is about a third of
what impeller driven hang on the back
filters will
cost. If you want more filtration than the filter is providing, you
simply add another filter. You also do
not run into
fry getting sucked into the filter, as is so often the case with filters
dependent on a siphon going out of
the tank.
Simple 1/2" extension tubes can be added of about 4 inches long,
and they can nearly double the strength
of the pull
of each filter, greatly increasing their effectiveness. These
can be seen on the box filters in the picture
above right.
When constructing a central air system, a couple rules
again come into play. The PVC used to carry the air
pressure
coming from your blower or air pump should be 2 inches in
diameter. A smaller diameter pipe
introduces
restriction you do do not want. It is also very important that
the PVC line MUST form a closed loop
out from the
pump, around the room, then back to the pump. Avoid lines that
extend out to service tanks that
end and do
not continue back to the main line and back
to the pump. Much resistance and uneven areas
are created when the PVC is not constructed this way.
Also, if you are not using all of the air being put out
by your pump, be sure to put in a valve that bleeds the
excess air off that you are not using. The goal is to
run the air with as little pressure as possible.
You want to avoid excess pressure in the line, as this will
eventually
damage the air pump.
2.The heaters
will each need their own plug. The exceptions to this are if you decide to
keep the room at the
temperature
that is best for the fish, keeping fish that all do best at that
temperature.
3.The tanks will all need
to be provided with light, and this can be done in a number of
ways, some requiring more
cords than
others. Obviously, if there is a way to keep cords to a minimum, you
should do so. It is far better, for
example, to go
with a light directly over a tank than light over 2 or three tanks from
a bulb 1-3 feet away. With recent
use of CFL
bulbs, (and “daylight” type CFLs are every bit as good, if not better,
than the old 4 foot cool white bulbs
used in the
past, for both the plants and the fish.) one emphasis in my fishroom has
been light fixture portability.
Rather than
relatively heavy 4 foot light hoods sitting on tanks, overview CFLs
are mounted above groups of tanks, and
individual
lightweight
shoplight type dome lights sit on tanks requiring better individual
light.
A small sheet
of plastic egg crate is placed under each dome so that the heat from the
light does not overheat the tank,
since they
are covered with the thermal sheeting. There is some transparency loss
with the plastic sheets. According to
websites
selling the material, the compromise in transparency is about 12%.
Fortunately, it maintains this transparency as
it does not
yellow, become opaque, and is easy to handle and clean (as opposed to
glass). The electrical cost of CFLs is
a fraction of
what the old 4 foot light hoods cost, so lighting can be provided a
little more generously.
Most
hobbyists run their electrical cords from a set place in each
tank so that all of the cords can be easily plugged
into
a power strip mounted along one side of the tanks. Heaters or lights a
distance from a power strip are then
plugged
into an extension cord that then goes into the power strip.
Those
concerned about such things advise that you should never plug one
extension cord into another, as this is
considered a
fire hazard. After speaking with electricians about this issue, they are
right, and it is advised not to plug
two extension
cords together to reach an outlet. However, everyone does it, and in
most fishrooms you will find numerous
examples of
it. No one has ever heard of a problem that has ever occurred in a
fishroom (or anywhere else) because of
this,
including the electricians I spoke to, so my advice is to keep
it to a minimum and be aware of any risk when making
the decision
to create that situation.
A few electrical
must do rules-
-Always use Ground
Fault Interrupt (GFI) plugs to protect the room from any possible
electrical shorting. Water
splashing
around in a fishroom is a normal state of affairs. Water splashing on an
electrical plug can be a big problem.
-Mount all plugs as high
as possible, at or above the highest nearest water line. Water can drip
down heater cords,
heavy
aeration routinely spills occasional water out of a tank if it is, say,
placed too close to a corner of the tank.
Creating a
“drip loop” with a cord is also an option, where the cord is looped and
tied off so that water will not run
down the
cord.
-Do not use the cheater adapters
that allow you to plug a grounded 3 pin plug into a standard 2 prong
outlet. Though
the risk of
any issue is again minimal, multiplied dozens or more times you are
asking for a problem you don’t need.
They also take up
extra space at the outlet, and simply are not the cleanest, most
professional way to do what needs
to be done. Until
recently, the common 4 foot shop light hood came with 3 prong cords, and
the most affordable
extension cords
were all two prong plugs. Today, the 4 foot hoods are less popular with
the arrival of longer lasting
CFL bulbs,
screw into a standard 2 pronged light socket.
You want to make
decisions that are permanent. Never take shortcuts just to get the tanks
up and running. Don’t put
something together
now just so that it will work, assuming you will have the time or desire
at some point in the
future to revisit
and redo it. You may revisit and do catch up repairs, but you won't want
to, and much will be overlooked.
-Watch your
amperage at each main plug. You may need to add a circuit or
two to your fuse box to accommodate
the electrical
load. Not terribly expensive, I was able to do it a number of times with
an electrician friend, but
necessary.
Without taking that step, you could be tripping the breaker to the room on a
regular basis, losing
electricity each
time, until some things are turned off or unplugged, and it is flipped
back on.
The type of
tanks you use- their size and shape, depends on the type of fish you
will be keeping. Provide the tanks
the fish require,
with an area of smaller tanks to raise fry, quarantine fish and work
with pairs when necessary.
Water always
spills- so aquariums over a carpeted or wooden floor need to be
carefully considered. Water does and
will spill,
routinely, for most people. I have seen fish rooms with carpeted floors-
and it becomes a big influence
when an effort to
keep the carpeting in good condition is a priority. For safety, however,
carpeting can be important
to help prevent
falls on a wet, slick floor. Indoor/outdoor carpeting works best,
bare against the concrete so that
it dries easily and
quickly. Removing it occasionally to dry out underneath, or to even
totally wash it is best.
I have used this in
the past and found that the carpeting will need to be replaced about
every 3-4 years.
Otherwise a bare concrete
floor works fine. Since it does become slick when wet, a durable,
waterproof shoe that
grips the floor should be
worn.
Do you want an automatic
water changing system to do water changes for you? If so, a
number of alternatives are
available, but a no
pumps, no drilling of tanks system is what is used here, and a
manual for building that type of
system is available
through Select Aquatics. An automatic system generally requires
that tanks be in level straight
rows, near one another,
etc. Close access to a sink and a line in to the city sewer
system is always a big advantage.
Plan out ahead of time
the type of water changing system you would like, and draw out
on paper the PVC infrastructure
within the racks that the
tanks will be on to determine how the rack, PVC and tanks need
to be arranged. (The automatic
water change system
article is now offered free from the same download page this
essay came from.)
If possible, having an
old refrigerator to keep the dried flake, pellet, frozen and
possibly live foods kept cool and out
of the warm, humid
fishroom is ideal. Keeping frozen ice cube trays of BBS,
beedheart feedings and purchasing and
storing dry foods in
larger quantities are all possible with a refrigerator.
|
|
|
|
|
|
 |
|
 |
|
|
|
|
Metal vs. wood, an older metal rack on the left,
a newer wooden rack on the right. |
|
Metal racks will deteriorate in a humid fishroom.
If ignored,
entire legs can rust away, leaving the
tanks holding
one another up. You need to replace
the racks before that happens! |
|
|
|
|
|
Depending on the number of tanks, you will need racks or some type of structures for the
tanks to sit on. Wooden
or metal? Metal racks
are made well these days and can be affordable at around $100 a rack.
However, metal
deteriorates, rusts and
can require replacement in about 10-15 years in the humid confines of a
fishroom. Wooden
racks are
sturdier, longer lasting, and are considered by some to be better
looking, and are also less expensive.
However, wooden racks
require construction, and hooking up with a friend with the appropriate
tools may be
necessary. Metal racks
can be bought at most home improvement stores, and the hardest part,
after having the
workman at the store put
it into your car for you, is getting the box, which weighs a ton, from
your car into the
house. Putting
them together goes pretty quickly.
I have known a couple people that built their fishrooms using 8
ft. planks of 3/4" wood over concrete foundation blocks.
The part of me that
appreciates convenience, simplicity, portability and low cost
loves that type of setup. But for a
section to be moved or
altered, everything needs to be taken down, unless you build the
stands in 4 foot sections, like
a typical wooden or metal
rack. Many do not consider that look to be professional or
attractive, but it is an alternative
that works. For a setup
anywhere but in a basement, however, the extra weight from that
type of setup may not be best
over wood braces on an
upper floor.
When you choose where the
footprint of the racks or stands will be, always plan to get around the
tanks easily,
and envision with each
tank being able to do the maintenance. A lovely presentation of tanks
flush against a wall
with plenty of open space
is nice, but over time any difficulty doing maintenance will catch up
with you. Ease of
doing maintenance must
always come first. 99% of the time the room only needs to look good for
you.
Place tanks on these
racks and stands so that they can be removed easily, tanks often
leak over time, and at
some point may need to be
replaced. Whenever that needs to occur is never a good time, so having
to drain a tank
or two around it first is
not a task you will appreciate when the time comes, if any are
hard to get to!
Rows of tanks, especially
with all of the PVC that goes with a water changing system, requires some
infrastructure
that can be unsightly.
Wiring for heaters and lights will be running everywhere, as well as
electrical power to the
blower or pumps you will
be using. To place the wiring entirely out of sight is a mistake.
Besides making maintenance
difficult, moisture will collect in
confined areas, and access to turn off the electricity easily must be
provided. It is best
to place the power strips
where they can be reached easily, and such that appliances can
be simply put in and removed.
Avoid long strings of
extension cords whenever possible, and be sure to install a GFI switch-
ground fault interrupt
switch before going into
the house electrical supply. This way a pathway provided through a wet
area will not lead to
being shocked or
electrocuted when working around live current and water.
Keep all wiring and air
tubing above the water levels of the tanks whenever possible. A
filter with an airline
that runs below the water
line of the tank it services can develop a siphon easily, running water
back into the
airpump, or to the PVC
line where the air is coming from, draining into other tanks. Keeping
the airlines above
the tanks avoids this.
Keep all wiring and air tubing, obviously, off the floor below the
tanks!
Pay attention to the wall
and ceiling material, and whether it will absorb moisture. The last
thing you want are
tanks up against a
dry-wall side of the room, where the minor unseen splashing from an
airstone will over time
stain and eventually
destroy the dry wall surface.
And lastly, provide space
for the room to grow, but keep in mind that everyone has their
physical and mental
limits. Over time, we all
get an idea of what the maximum is we can handle, allowing for
occasionally being
under the weather and
times when you simply need a break. The fish room is not a full time
job. I try to keep
my room only as large as
I know I can provide 100% care. If I ever begin to feel
overwhelmed, or the room
has become a challenge to
routinely maintain, I cut back. The room I currently run is about 120
tanks, mostly
10s, 20s, 30s and 50s.
There are others that take care of 200 little betta tanks without a
problem, and those
whose single 30 gallon
tank takes up all of their time. You need to decide what you are capable
of, and what
you are willing to take
on over the long term.
For me, a room of about
20 tanks existed for about 7 years in Northern California. That was my
maximum at
that time. Everything was
done manually. With a move to another location in Colorado, the room
expanded to
40 tanks with a basic water
changing system. That continued for 3 years. Another move, and the fish
room went
to 60 tanks, where it stayed
for 5 years. Then, with the advent of Select Aquatics, the room doubled
in size,
and now runs 120 tanks, and I
know that it would not be fair to the fish, myself or my patient wife if
I added
any more!
Greg Sage
selectaquatics.com
selectaquatics@gmail.com
|
|
|
|
|
|
|
|
|
|
|
|
|
|
|
|
|
|
|
|